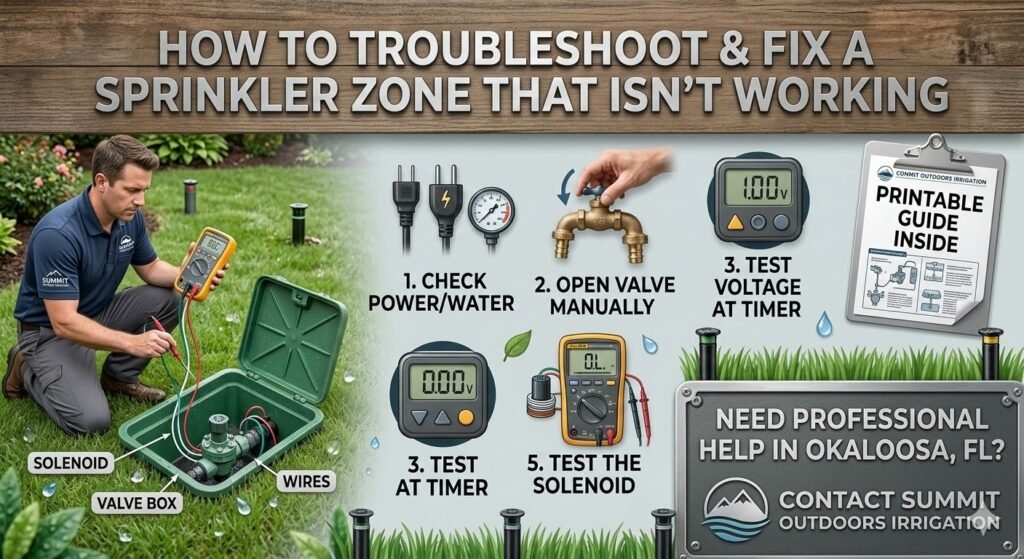
A sprinkler zone not working can leave part of your lawn dry while the rest of your irrigation system continues to operate normally. You may notice that one section of the yard receives no water, sprinkler heads fail to pop up, or the zone starts briefly before shutting off. Although these problems can be frustrating, they do not always mean you need to replace your entire sprinkler system.
In many cases, the cause is a simple issue with the irrigation controller, water supply, sprinkler valve, electrical wiring, or solenoid. Identifying the problem correctly can help you avoid unnecessary repairs and restore proper watering to your lawn.
For homeowners in Okaloosa County, Florida, a reliable sprinkler system is especially important during hot weather. Inconsistent watering can leave grass stressed, create dry patches, and make landscape maintenance more difficult.
This guide explains seven common reasons a sprinkler zone may stop working, how to troubleshoot the problem safely, which repairs may be manageable for homeowners, and when professional sprinkler repair is the better option.
How Does a Sprinkler Zone Work?
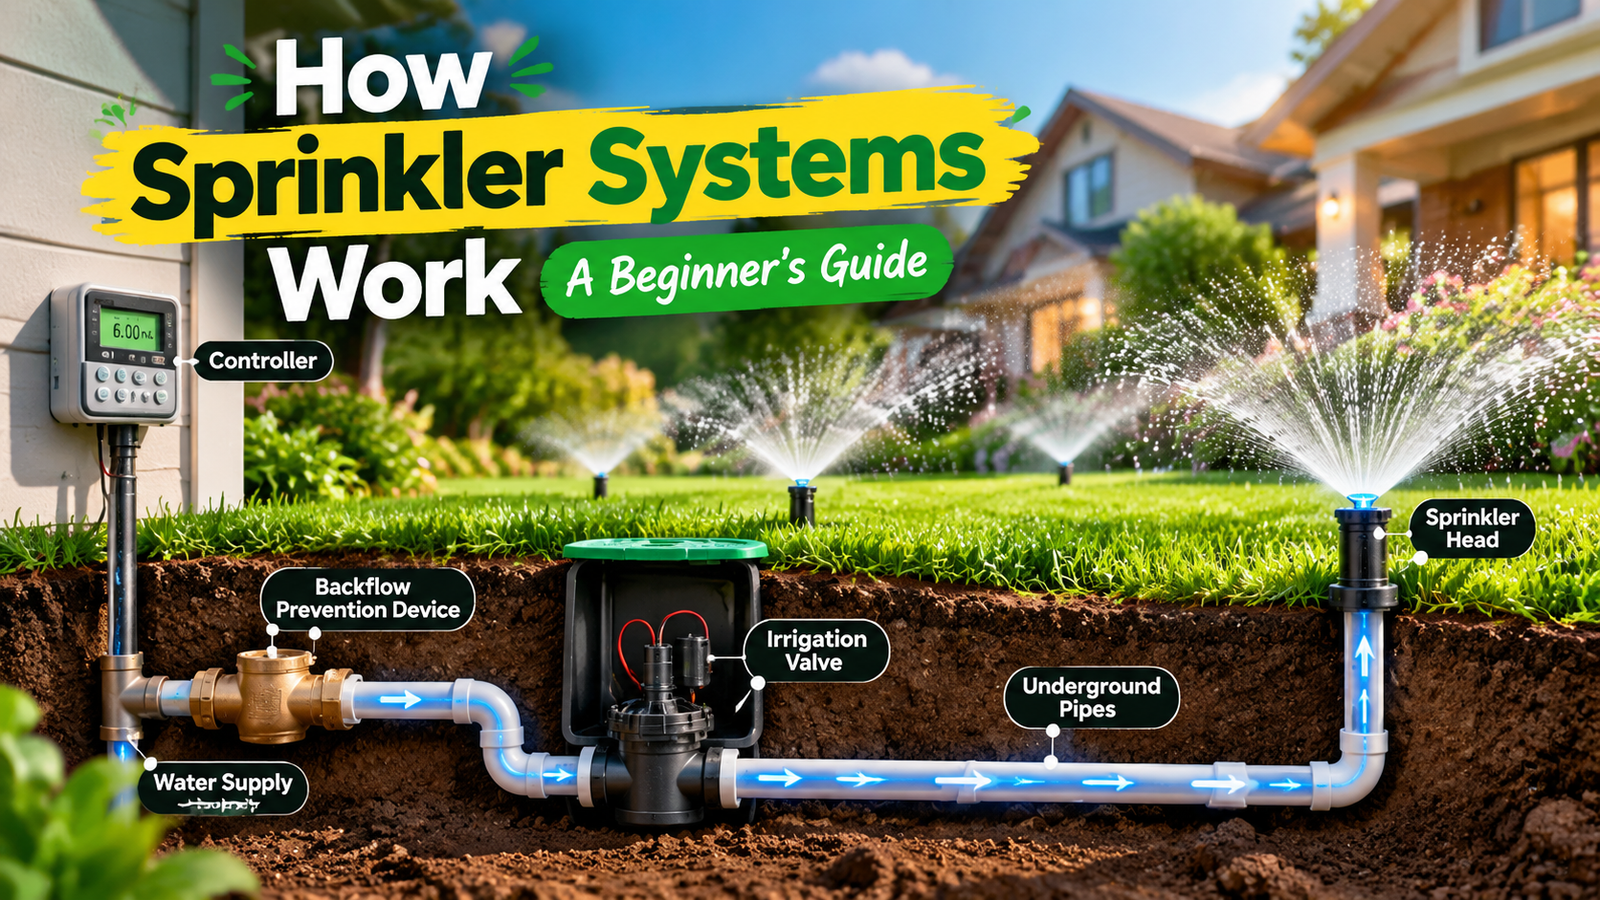
Before troubleshooting a sprinkler zone that will not turn on, it helps to understand how the irrigation system operates.
Most automatic sprinkler systems are divided into zones. Each zone waters a particular section of the lawn or landscape. Dividing a property into zones allows the system to distribute water according to the needs of different areas.
An irrigation controller, sometimes called a sprinkler timer, sends an electrical signal to the valve assigned to a particular zone. The valve opens, allowing water to flow through underground pipes to the sprinkler heads. Once the controller activates another zone or ends the watering cycle, the valve closes.
Many residential sprinkler systems use electrically operated solenoid valves. The solenoid responds to the controller’s signal, allowing the valve mechanism to open or close.
You can learn more about the basic operation of an irrigation controller and a solenoid valve.
Several components must work together for a zone to operate correctly:
- Irrigation controller: Sends the signal that activates the selected zone.
- Electrical wiring: Carries the control signal from the controller to the valve.
- Solenoid: Operates the valve in response to the electrical signal.
- Sprinkler valve: Controls water flow into the zone.
- Water supply: Provides sufficient water for the sprinkler heads.
- Pipes and sprinkler heads: Distribute water throughout the designated area.
If one of these components fails, the affected zone may stop working even when the rest of the system operates normally.
Understanding this process helps narrow down the possible causes instead of replacing parts without confirming what is wrong.
7 Reasons Your Sprinkler Zone Is Not Working
1. The Irrigation Controller Is Not Activating the Zone
One of the first things to check when a sprinkler zone is not working is the irrigation controller.
The controller determines when each zone operates. If the settings are incorrect or the controller cannot send the required signal, the affected zone may not start.
Start by checking the controller display. Make sure the unit has power and that the system is not displaying an error message.
Next, review the programmed watering schedule. Confirm that the affected zone is enabled and that its run time is greater than zero. Some controllers allow individual zones to be disabled, which can make a functioning system appear to have a mechanical problem.
If your controller supports manual operation, try starting the affected zone directly from the control panel.
Observe what happens:
- If the zone starts normally, the issue may involve the programmed schedule.
- If the controller displays an error, consult the manufacturer’s instructions.
- If other zones work but one does not, the issue may involve that zone’s settings, wiring, valve, or controller output.
- If no zones work, check the controller’s power supply and the system’s main water supply.
A controller that has lost its programming after a power interruption may need to be configured again.
Do not open the controller or handle exposed wiring while troubleshooting. If the controller has power but cannot activate a particular zone, a technician can test its output and determine whether repair or replacement is necessary.
2. The Main Water Supply Is Turned Off or Restricted
A sprinkler zone may fail to deliver water because the water supply is interrupted or restricted.
Check whether the irrigation system’s main water valve is open. A valve that was accidentally closed during landscaping, plumbing work, or seasonal maintenance can prevent water from reaching the sprinkler system.
If the system uses a well, pump, or another dedicated water source, the problem may involve the supply equipment rather than the sprinkler zone itself.
Look for obvious signs such as reduced water flow across multiple zones, a pump that does not operate normally, or a visible leak near accessible irrigation pipes.
The symptoms can help distinguish a water supply problem from an electrical fault.
For example, if several zones suddenly produce weak sprays or fail to operate, investigate the main supply and pump before assuming that every individual zone valve has failed.
If only one zone is affected while the others operate normally, a local valve, pipe, or wiring issue may be more likely.
Never force a stuck valve or dismantle pressurized plumbing. If the water source involves a pump, electrical equipment, or an inaccessible main valve, professional inspection may be necessary.
Restoring an adequate water supply can resolve the problem without replacing the controller or sprinkler valve.
3. The Sprinkler Valve Is Stuck or Clogged
A sprinkler valve controls the flow of water into an individual zone. When the valve cannot open properly, the sprinkler heads may receive little or no water.
Valve problems can develop because of dirt, sediment, worn components, a damaged diaphragm, or debris interfering with the valve’s operation.
In some cases, a valve may also become stuck after a period of inactivity.
If the controller appears to be working and the water supply is available, the valve is a logical next component to investigate.
First, locate the valve box associated with the affected zone, if it is accessible. Look for obvious signs of flooding, damaged wiring, or visible deterioration around the box.
Some irrigation valves have a manual bleed screw or a solenoid that can be turned slightly according to the manufacturer’s instructions. Opening the valve manually may help determine whether the valve can pass water.
However, follow the specific instructions for your valve model. Do not force the solenoid, remove the valve cover while the system is pressurized, or attempt a manual test near exposed electrical connections.
If the zone operates when the valve is opened manually, the water supply and mechanical valve may be functioning, which makes an electrical or control issue more likely.
If water still does not flow, the valve may be obstructed, damaged, or affected by a separate water supply problem.
Cleaning or repairing a valve may be sufficient in some cases. If its internal components are damaged or the valve repeatedly fails, replacement may be the more practical option.
4. The Solenoid Has Failed
The solenoid is an important part of an electrically operated sprinkler valve. It receives the controller’s signal and helps operate the valve.
When a solenoid fails, the affected sprinkler zone may stop responding even though the rest of the irrigation system continues to work.
Common symptoms include a zone that does not activate automatically, a valve that works manually but not through the controller, or a zone that operates intermittently.
A failed solenoid is only one possible cause of these symptoms. Damaged wiring, poor electrical connections, or a faulty controller output can produce similar results.
A technician can check the relevant electrical connections and test the solenoid according to the manufacturer’s specifications.
Resistance readings vary by solenoid model, so there is no single ohm value that applies to every sprinkler valve. Follow the equipment documentation rather than relying on a universal measurement.
Before any electrical testing, the equipment must be safely isolated from its power source. Homeowners should avoid testing live connections or opening electrical enclosures.
If testing confirms that the solenoid has failed, replacing that component may restore normal operation without replacing the entire valve assembly.
For more complex electrical problems, professional sprinkler repair can help prevent additional damage to the irrigation controller and wiring.
5. Damaged or Loose Sprinkler Wiring Is Interrupting the Signal
Sprinkler systems often use low-voltage wiring to connect the controller to individual zone valves.
Because some of these wires run underground, they can be damaged by landscaping, digging, root growth, moisture intrusion, corrosion, or accidental cuts.
A loose connection inside a valve box can also interrupt the electrical signal.
If one zone stops working while the other zones operate normally, the wiring serving that zone may deserve attention.
A professional can compare the controller’s output with the electrical signal reaching the valve. This helps determine whether the problem originates at the controller, somewhere along the wiring route, or at the valve itself.
When a wiring problem is confirmed, the damaged section may be repaired or replaced. Connections should use appropriate materials and methods for underground irrigation wiring to help protect them from moisture and corrosion.
Do not assume that running an entirely new wire is always necessary. Testing the existing circuit first can help identify the actual location of the fault and prevent unnecessary work.
Electrical troubleshooting can be hazardous when performed incorrectly, even on low-voltage systems. Avoid handling exposed conductors or using test equipment without the appropriate knowledge.
If a sprinkler zone is not working because of a wiring fault, accurate diagnosis is often more effective than replacing the valve or controller without evidence that either component has failed.
6. The Sprinkler Heads or Pipes Are Blocked or Damaged
Sometimes the controller, wiring, solenoid, and valve are functioning correctly, but water still does not reach the lawn as expected.
A blocked sprinkler head, damaged underground pipe, restricted filter, or leaking connection can interfere with water distribution.
If the affected zone activates but produces weak sprays, uneven coverage, or water pooling in one area, investigate the visible symptoms before assuming the valve has failed.
Check accessible sprinkler heads for dirt, grass clippings, or other debris that may obstruct the spray pattern. Look for cracked heads, tilted sprinklers, or visible leaks around the lawn.
A damaged underground pipe may create a wet patch or cause pressure to drop across the affected zone. However, not every underground leak produces obvious surface water.
The symptoms also depend on where the obstruction or leak occurs. A blocked individual sprinkler head usually affects a small area, while a major pipe problem may affect several heads.
Do not dig blindly to locate an underground leak. A professional can inspect the system and identify the likely location before excavation begins.
Cleaning a blocked head or replacing a damaged sprinkler component may be enough to restore normal coverage.
If multiple components are affected, a broader inspection may help prevent recurring problems and improve the system’s overall performance.
7. The System Has a Pressure or Irrigation Pump Problem
If a sprinkler zone is not working properly, low water pressure may be part of the problem.
A zone that receives insufficient pressure may produce weak sprays, fail to operate certain sprinkler heads correctly, or distribute water unevenly.
Possible causes include a restricted water supply, leaking pipes, a malfunctioning valve, an irrigation pump problem, or an incorrect system configuration.
The pattern of the problem is particularly useful.
If only one zone is affected and the other zones operate normally, a local problem is more likely. If several zones experience low pressure, the main supply, pump, or shared plumbing may require inspection.
For properties that depend on an irrigation pump, listen for unusual noises and observe whether the pump starts normally. A pump that repeatedly loses prime, runs without delivering water, or refuses to start should be inspected.
Do not run a pump that appears to be operating without sufficient water. Stop using it if there are signs of overheating, severe mechanical noise, or an electrical problem.
A professional can evaluate the pump, water source, valves, and plumbing to identify the cause of the pressure loss.
Correcting the underlying problem can restore proper irrigation without unnecessary replacement of otherwise functional sprinkler components.
Step-by-Step Sprinkler Zone Troubleshooting Checklist
If you are unsure where to begin, follow this general troubleshooting sequence.
Step 1: Identify the affected zone.
Run the system using its normal controls, if it is safe to do so. Identify which zone fails and whether other zones operate normally.
Step 2: Check the controller.
Confirm that the controller has power, the zone is enabled, and the programmed schedule or manual activation settings are correct.
Step 3: Check the water supply.
Verify that the main irrigation water valve is open and look for obvious signs of restricted water flow or leakage.
Step 4: Observe the sprinkler valve.
If the valve box is accessible, look for visible damage, flooding, or corrosion. Follow the manufacturer’s instructions before attempting any manual valve operation.
Step 5: Consider electrical problems.
If the valve works manually but not automatically, a controller, wiring, or solenoid issue may be responsible. Professional electrical testing can help isolate the fault.
Step 6: Inspect sprinkler heads and accessible pipes.
Look for visible obstructions, broken heads, leaks, or signs of uneven water distribution.
Step 7: Evaluate pressure and pump performance.
If several zones have problems, investigate shared water supply components and the irrigation pump.
Step 8: Decide whether professional service is necessary.
If the cause is unclear, the issue involves electrical components, or the problem persists after basic checks, arrange an inspection rather than replacing parts at random.
Following this sequence can help narrow down the possibilities and make a repair visit more productive.
Common Sprinkler Zone Problems and Possible Solutions
| Symptom | Possible cause | Recommended next step |
|---|---|---|
| One zone will not start | Controller setting, wiring, solenoid, or valve | Check settings and arrange testing if needed |
| All zones fail | Power interruption or main water supply problem | Check controller power and water availability |
| Valve works manually but not automatically | Electrical signal or control issue | Have the controller, wiring, and solenoid tested |
| Sprinklers produce weak sprays | Restricted supply, blockage, leak, or pressure issue | Inspect visible heads and evaluate system pressure |
| Water pools near the valve box | Leaking connection or damaged valve | Stop unnecessary operation and arrange inspection |
| Pump runs but water flow is poor | Water supply, suction, pump, or plumbing problem | Have the pump and supply system evaluated |
These are general troubleshooting possibilities rather than definitive diagnoses. Different sprinkler systems can exhibit similar symptoms for different reasons.
When Should You Call a Professional Sprinkler Repair Service?
Basic observations can help homeowners narrow down the problem, but some irrigation issues require specialized tools and experience.
Consider professional service if the controller repeatedly fails, the valve does not respond despite correct settings, underground wiring appears damaged, or the system continues to lose pressure.
Professional assistance is also advisable when a pump makes unusual noises, electrical equipment becomes wet, a breaker trips repeatedly, or an underground leak cannot be located.
A technician can test the controller output, inspect valve operation, evaluate wiring continuity, and assess the water supply. This approach helps determine which component needs attention and reduces the risk of replacing functional parts.
If you need help diagnosing a sprinkler zone that will not turn on, Summit Outdoors Irrigation provides sprinkler system repair services in Okaloosa County.
Homeowners can also explore our local service information for Fort Walton Beach, Niceville, Destin, and Shalimar.
The goal is to identify the underlying cause and restore reliable watering with the appropriate repair.
How to Prevent Future Sprinkler Zone Problems
Routine maintenance can help identify developing irrigation problems before they interrupt watering.
Inspect Your System Seasonally
Check your sprinkler system before periods of heavy use. Look for damaged heads, visible leaks, uneven spray patterns, and changes in pressure.
The EPA WaterSense sprinkler maintenance guidance offers useful advice on seasonal inspections and improving irrigation efficiency.
Keep Sprinkler Heads Clear
Grass, soil, mulch, and debris can interfere with sprinkler-head movement and water distribution.
Inspect visible heads regularly and address obstructions before they cause persistent coverage problems.
Watch for Changes in Water Pressure
A sudden change in pressure may indicate a leak, obstruction, water supply issue, or pump problem.
Investigating changes early can help prevent more extensive damage.
Protect Valve Boxes and Wiring
Keep accessible valve boxes clear of excessive debris and avoid damaging buried irrigation wiring during landscaping or digging.
If you are planning excavation, identify underground utilities and irrigation lines before work begins.
Maintain the Irrigation Controller
Check that the controller’s settings match your watering needs and that the correct zones activate at the appropriate times.
Review the manufacturer’s instructions when adjusting schedules or troubleshooting error messages.
Repair Small Problems Promptly
A damaged sprinkler head or leaking connection can affect water distribution and waste water.
Correcting visible problems early helps maintain consistent irrigation and makes it easier to identify other developing issues.
Frequently Asked Questions
Why is one sprinkler zone not working while the others work?
The problem may involve that zone’s controller settings, wiring, solenoid, valve, or local plumbing. Since other zones operate normally, start by checking the affected zone’s settings before investigating its individual components.
Why does my sprinkler zone have no water?
A closed valve, blocked pipe, failed valve, restricted water supply, or pump problem may prevent water from reaching the zone. The correct diagnosis depends on whether the valve activates and whether other zones receive water normally.
Why does my sprinkler valve work manually but not automatically?
This may indicate a problem with the controller signal, electrical wiring, solenoid, or a related connection. A technician can test the circuit to determine where the signal is interrupted.
Can a bad solenoid cause one sprinkler zone to stop working?
Yes. A failed solenoid can prevent an electrically operated valve from opening correctly. However, wiring problems and controller faults can produce similar symptoms, so testing is important before replacing the solenoid.
How do I know if my sprinkler valve is bad?
Possible signs include a zone that fails to open, water that continues flowing after the zone should close, or visible leakage around the valve. These symptoms can also result from other system problems, so inspect the valve before deciding to replace it.
Can I troubleshoot a sprinkler zone myself?
You can safely check controller settings, observe sprinkler performance, and look for visible leaks or obstructions. Electrical testing, internal valve repairs, and pump troubleshooting may require a qualified professional.
Why is my sprinkler zone working intermittently?
Intermittent operation can result from loose electrical connections, a failing solenoid, controller problems, inconsistent water supply, or a valve that does not operate reliably. Professional diagnosis can help isolate the cause.
How much does sprinkler zone repair cost?
Repair costs depend on the problem, required parts, accessibility, and labor. A minor adjustment may cost less than replacing a valve or repairing underground wiring. Request an assessment for an accurate estimate.
How can I prevent sprinkler zones from failing?
Inspect the system seasonally, maintain the controller, keep sprinkler heads clear, repair leaks promptly, and address unusual pressure changes before they become more serious.
Need Help Fixing a Sprinkler Zone That Is Not Working?
A sprinkler zone that stops working does not necessarily mean your entire irrigation system needs replacement. The problem may be as simple as an incorrect controller setting or as complex as damaged underground wiring or a failed valve.
Start with basic observations, identify whether one zone or several zones are affected, and avoid unnecessary repairs before confirming the cause.
If your sprinkler system still will not operate correctly, contact Summit Outdoors Irrigation for help with irrigation troubleshooting and sprinkler repair in Okaloosa County, Florida.
A properly functioning irrigation system helps maintain more consistent lawn coverage, supports healthy landscaping, and reduces avoidable water waste.